
Photo box for miniatures
Idea and instructions by Anna-Carin Betzén
I wanted a photo box that was a suitable size for my miniatures (1:48 scale furniture and roomboxes, and occasional 1:12 scale items), and easy to put a seamless backdrop in. Paper makes the best backdrops as it's easy to find, there are lots of colors, and it doesn't need ironing! So, I decided to design a photo box that uses a standard size sheet of paper for backdrop.
This is what I came up with. The sheet is "miraculously" held in place by four photo corners, making it really easy to change. I keep a bunch of colored papers for backdrops stored in a plastic folder to protect them from dust, fading and wrinkles. For my website, I mostly use plain white backgrounds - i.e. regular printer/copier paper. If a miniature tends to topple over, I secure it to the paper with a bit of Tacky Wax. If the wax leaves a mark, I just replace the sheet of paper.
Supplies and tools
- Cardboard that is at least 1.5 mm (1/16") thick - mine was 2 mm
- Utility knife
- Straightedge and a set square
- Tacky Glue or similar
- Masking tape to hold it together during assembly
- Four adhesive photo corners (mine were clear but colored ones are probably better)
Parts needed
As the whole point is to make the photo box fit the paper size, I'm providing two sets of measurements to cater for both A4 and letter size paper. Select size and cut parts as follows:
| Box to fit A4 paper
(A4 is 210×297 mm or 8 1/4"×11 3/4") |
Box to fit letter size paper
(Letter is 8.5"×11" or 216×279 mm) |
|
|---|---|---|
| Base | Width: 21.5 cm
Depth: 15.5 cm |
Width: 8 3/4"
Depth: 5 5/8" |
| Back | Width: 21.5 cm
Height: 17cm + cardboard thickness |
Width: 8 3/4"
Height: 6 1/2" + cardboard thickness |
| Sides (cut 2) | Depth: 15.5 cm + cardboard thickness
Height: 17 cm + cardboard thickness |
Depth: 5 5/8" + cardboard thickness
Height: 6 1/2" + cardboard thickness |
As the back and base differ in size, you can turn the box around to make it a little deeper and lower or taller and shallower depending on what you're photographing. The difference is small (only 1.5 cm or 5/8"), but it does make a difference in taking photos of e.g. 1:48 scale roomboxes.
I cut a semi-circle "thumb grip" at the top of the back piece (i.e. in the center of the longest side). This is entirely optional, but it makes it easier to remove a sheet of paper. It also makes it easy to spot which is the tallest side.
Assembly
- Glue back to the edge of the base. Secure with masking tape at a 90° angle while the glue dries.
- Glue sides to the edges of back/base assembly. Secure with masking tape.
- When dry, remove all masking tape (careful, so you don't peel off the cardboard's surface layer).
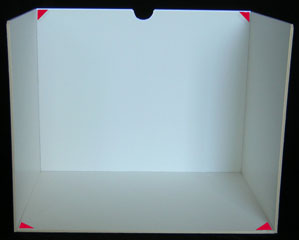
- Add photo corners in the outer corners of the back and base (shown in red in this photo).
Now you're ready to slide a sheet of paper into the photo corners and take a photo using your new photo box. I find it easiest to fit the paper sheet in the base photo corners first, and then in the upper ones.
To remove a sheet of paper, just push down in the thumb grip so the paper slips out of the upper corners, then pull it gently out of the two others.